Making your 1960's radio IoT-ready
Dec 01, 2016
A small DIY project on how to enable live MP3 streaming on old analog radios.
Introduction
Old AM/FM radios have a charm of their own. Their robust materials, polished surfaces and mellow sound rendition provide a listening experience unlike any other. And of course, once you take a peek inside, the palm-sized adjustable capacitors and transistor-based amplifiers will warm the heart of any electronics enthusiast. However, not all of them can stand the test of time. It’s now been almost 60 years since portable AM/FM radio had its heyday, and although some models were definitely built to last (like the Beolit series from B&O), some others have aged badly. Here I’ll show you a few very easy steps to turn your dusty old radio set into a WiFi radio, using only a Raspberry Pi and a few programming skills. The whole operation should cost you less than 100$, which is still less than many high-end internet radios.
What you’ll need
- a more-or-less working AM/FM radio (see below)
- a Raspberry Pi with SD card. The setup below uses a v.2 model B. The power block is optional but not having it means you have to find a powerful enough +5V source in your radio.
- a WiFi dongle (the RPi 3 has an embedded WiFi chip, so you might not need this, although reception might be poor if your radio is far from your router)
- a 3.5mm ground loop isolator (they go for around 10$ on Amazon). Not needed if you use the radio to power the Pi.
- a 3.5mm Jack cable
- a 3.5mm Jack female plug
- a soldering iron and some solder wire
- a rotary encoder (usually bought in 10x packs), which we’ll use to replace the tuning dial.
Playing (radio) doctor
The first step is to assess the state your radio is in. This is important, because it will determine how we are going to interface the Raspberry Pi to the radio’s circuitry. Without going in too much detail, a radio receiver is divided into several parts, or “stages” that feed into each other like a pipeline. By doing a variety of tests we can diagnose if something’s wrong, and if yes, where the problem is. The first stage is the receiving end, which consists of an antenna and one or several RF amplifiers. This stage receives the radio signal and boosts it. That is then fed into a detector, which separates the carrier and modulating waves. One or several amplifiers then boost the signal once again to make it audible through a high-powered speaker, usually a few watts. (see a very good guide here.)

Let’s see what’s broken: first, try turning your radio on.
- If you hear no sound at all even at full volume, no matter how you turn the tuning button, there is probably an issue with the power block. This is usually a bulky circuit with one or several transformers. Good news is, these are fairly replaceable and/or easy to fix as the reason for failure is often a blown capacitor. Check out this guide for fixing SMPS-type power supplies and this one for fixing older linear transformers.
- If you can determine that your radio is powered on (via a LED or the characteristic “twung” sound when power is turned on) but nothing else is working, the amplification stage of your radio might be broken. You might hear a very faint hiss, or low levels of volume. This is annoying, because amplifiers are more tricky ro repair (they usually require transistors, which are not produced in the same way as they were back then). The solution here is to bypass the old electronics entirely and connect your own amplifier to the loudspeaker, for example one that you salvaged from PC loudspeakers.
- If you hear some sound, even if it’s crackling, and if turning the volume button is having the expected effect, great. The amplification stage of your radio is working. This means that we’ll be able to feed in our modern sound into a vintage amplifier.
- If your radio has a headphone jack or an auxiliary output, try and test that. Usually, if the secondary amplification is working, chances are that will be working as well.
- The last step is to test whether the device is able to actually receive radio signals. In short, you will be extremely lucky if your set is still able to receive the right frequency for a given position of the tuning knob. The next section goes into a bit more detail as to why that is, but it gets a bit technical so feel free to skip it. The bottom line is that this is the hardest part of the circuitry to repair, and it would require a lot of dexterity and knowledge that goes beyond what we are trying to achieve here.
A bit of history
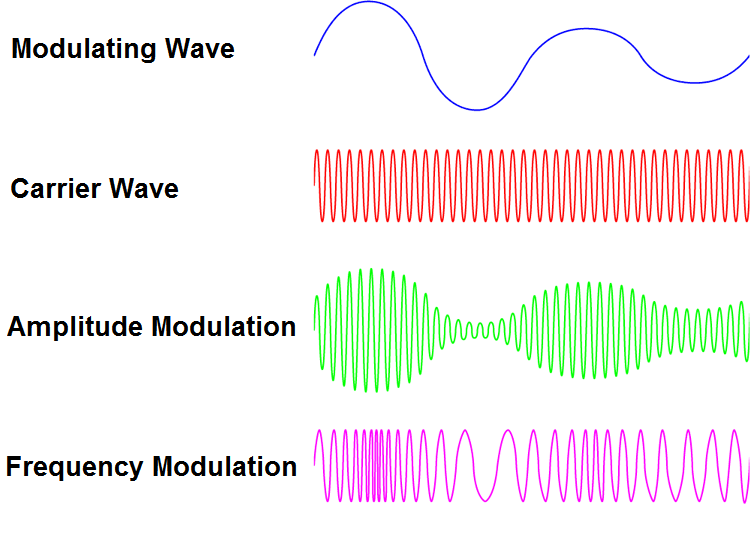
Nowadays radio receivers mostly deal with digital signals (via DAB - Digital Audio Broadcast), whether it’s the media player in your car or the wifi chip in your laptop. However in the 60’s, radio signals were mostly analog. This meant that there were two ways to transmit information: amplitude and frequency modulation. Basically, a modulating wave (the sound you want to transmit) is embedded in a carrier wave (the frequency of the station you are tuned into). The simplest way to transmit the modulating signal is to boost the carrier wave when the volume of your signal is strong, and to attenuate it when it is weak. In this way the “height”, or amplitude of the carrier is changed, this procedure is called amplitude modulation or AM. In the case of frequency modulation or FM, the carrier is compressed (frequency increase) when the signal is strong and dilated (frequency decrease) when it is weak. Here, the frequency of the transmitted signal fluctuates slightly around the carrier frequency, the radio therefore had to listen to a narrow “band” of wavelengths instead of a single frequency. This explains why FM receivers generally have a more complex design than AM receivers, which were historically the first to be developed. Note that in both cases, the frequency of the carrier has to be much higher than that of our signal.
Both modes of transmission are fundamentally different, and require separate circuits to work, which means they can function (and break down) independently of each other. Quite often, for old tri-band radio sets, you will find that FM reception is still quite decent, whereas the AM bands have deteriorated notably, leaving you with few or no stations detectable on your receiver.
If you can’t get any stations on any band, it might just be a reception problem. Try moving closer to a window. Extending and moving the telescopic antenna around makes a difference only for FM/UKW. For AM bands like SW, MW and LW, try changing the orientation of your radio set to improve reception.

On older models, oscillating circuits were calibrated to the AM/FM ranges by adjusting several capacitors, which might have gotten slightly shifted with age (they look like the metal boxes with a screw on top in the image above). This means the radio will “listen” to a wrong part of the frequency spectrum, where no stations are emitting. Recalibrating such a circuit is possible, but requires a lot of skill and access to the original engineer’s documentation for your model.
Getting hold of the schematics
This is an important step. Although manufacturers usually followed pretty similar rules in assembling their designs, the insides of two models might differ significantly.
50 years ago, people were a bit more comfortable with tinkering, so some models were actually shipped with the schematics inside the radio itself. Remove the bottom or back cover and if you’re lucky, you’ll find the precious slip of paper inside a small envelope glued to the chassis.
Fortunately, there are a lots of enthusiasts out there, and the schematics for many models were painstakingly scanned. Good places to check out are Radio Museum and Valve Radio, other than that, GIYF. Consider donating to these websites, as they are all maintained by amateurs.
In our case, the set was a Roberts R900, for which Valve Radio offers downloadable schematics:

Making sense of it all
This will get easier with habit, but the schematics will usually help you. The idea is to identify the different stages, which will have their components grouped together in an orderly fashion. The schematic above is annotated to make reading easier:
- In red, the power block. It’s easy to notice due to the oversized transformer and the mention of 240V AC.
- in orange, the oscillator and FM front-end
- in blue, the AM/FM amplifier and detector
- in light green, the DIN inlet. This type of connector has almost completely disappeared nowadays, but was fairly common in the 70’s and 80’s. On some models (this one included) it can be used to feed in an auxiliary source of audio (AUX), providing non-invasive access to the loudspeaker. You can see the input line feeding into the amplifier stage just before C37.
- in purple, the amplifier stage. This is what will boost the sound coming in from either the AM/FM stage or the DIN plug to acceptable levels. The loudspeaker pictogram and the 3 variable resistors controlling volume and bass/treble filters (VR1, VR2 and VR3) are clearly visible.
These are actually quite easy to figure out on this model, because it is modern enough to feature integrated circuits (IC). These have standardised part numbers which lead you to their datasheets, most of which are found online.
Choosing the method
Now that we have a rough idea of what the components are doing, we must choose how to feed in the sound from our Raspberry Pi, which will deliver the internet radio part of the assembly.
- the non-invasive method where you use the DIN plug to feed in the sound. The advantage is that you retain the AM/FM capability of your set. Use this for radios that are in an overall good working order, or models that do not have sufficient free space in the chassis to accommodate a Raspberry Pi. The disadvantage here is mostly aesthetic, as you’ll essentially have your Pi in an external casing, with its own power source and controls.
- the invasive method where you disconnect the amplification stage from the rest and solder in a connection to your Pi. The disadvantage here is obvious, as you are modifying (although not irremediably) the electronics of your radio. Use this method for sets that are heavily damaged, if you don’t think you are able or likely to repair it in the future, or if having an “invisible” modification is important to you. I would still advise to keep all the components you remove so that they can be fitted back in the future. This is best done on cheap run-of-the-mill models, as opposed to rarer designs that are best kept as they are.
For our Roberts R900, the FM receiving part was heavily damaged, so we went for the invasive method. On another model, the Beolit 600 which is a magnificent piece of engineering, we went for the non-invasive one.
Setting up the Raspberry Pi
Our preferred distribution would have been Arch, but since it had some difficulty dealing with our Wifi adapter driver, we used Raspbian.
First, install Raspbian, a Debian-derived Linux distribution for Raspberry Pi. You can download a SD card image (without Desktop is fine) or try using NOOBS, an installer for beginners which tries to make things simpler:
- Download the NOOBS network install image from the Raspberry Pi website
- You will get a very small (~25Mb) zip file. Put the content of that onto an SD card that you will just have formatted in FAT32 format
- If you have an HDMI display, you might need to create a
config.txtfile in the root of the SD card. I have a 7” capacitive display, which needs the lines described inboot/config.txt. - NOOBS will walk you through the installation of the Raspbian distribution.
- After installation, power off the Pi, connect it to another machine and edit config.txt again to make Raspbian compatible with your display.
After installing Raspbian using NOOBS, we have to clean up the filesystem a bit. We will run the Pi headless (without display), so there is no need for the X graphical interface.
sudo apt-get -y remove --auto-remove --purge cups*
sudo apt-get -y remove auto-remove --purge gnome*
sudo apt-get -y remove auto-remove --purge x11-common*
sudo apt-get -y autoremove
We do not need Java or Wolfram or games or a synthetiser either:
sudo apt-get -y remove --auto-remove --purge wolfram-engine penguinpuzzle java-common minecraft-pi raspberrypi-artwork sonic-pi
To remove all of them at once, download this README file and do some bash magic:
grep apt <(wget -O- https://bitbucket.org/agilly/pi-radio-firmware/raw/c852a2a4e6ddbb007b46f72a5faf3a0c92542cb1/README.md) | source /dev/stdin
Edit the name of the Pi by modifying /etc/hosts and /etc/hostname, and change the password using sudo passwd pi.
We will need some packages to build Python libraries and play MP3 streams:
sudo apt-get install mpg321 python2.7-dev
We install the Python libraries we need:
sudo pip install llist
And finally, we check out the repository that contains the firmware, which will download all essential files:
cd
git clone https://github.com/agilly/pi-radio-firmware.git
All that’s left is to replace admin to your username in firmware.py at line radiolist="/home/admin/pi-radio-firmware/firmware/radiolist". Now we are ready to test the firmware:
pi-radio-firmware/firmware/firmware.py
You should see something like:
=====WAIT STATE====
This means the firmware is running. Press Ctrl+C to interrupt.
Connecting to your local wifi network
We assume you know how to do this, but in case you don’t, there are guides all over the internet, for example here.
Installing the firmware
We’ve seen the firmware works, but we must ensure that it runs whenever the Raspberry pi is on. We use a software called monit, which as the name suggests, monitors services and ensures they are running. We install it with:
sudo apt-get install monit
Then edit the file /etc/monit/monitrc with sudo nano and add the following:
## Change admin to your username
check process firmware with pidfile "/tmp/firmware.pid"
        start program = "/usr/bin/sudo /home/admin/pi-radio-firmware/firmware/firmware"

## This ensures that the WiFi connection is alive by checking google.com. If unresponsive, restarts the wlan0 interface (you might need to change this). You might need to change this to fit your connection.

check host google.com with address google.com
        start program = "/sbin/ifup --force wlan0" with timeout 30 seconds
        stop program = "/sbin/ifdown wlan0"
        if failed ping with timeout 2 seconds then restart
        if 2 restarts within 15 cycles then exec "/sbin/shutdown -r now"
Then restart the Pi. The firmware will now be running as a service.
Customising the list of channels
The list of channels the radio will loop through is described in the radiolist file. The original one might not be very helpful for you (it contains mostly French and Austrian stations), so feel free to edit it. The syntax is pretty straightforward, each line is composed of:
address language_code name
separated by tabs. The language doesn’t matter so much anymore. In a previous version of the firmware, the Pi would access Google speech to pronounce the name field in the language specified by language_code. For example, you would hear “BBC Radio 4” a few instants before the station started playing. But Google decided to withdraw this service, so now you must add your own recording of the station name (or if you don’t want this, an empty MP3).
Each entry in the
namecolumn must correspond to a MP3 file in the same directory as the firmware. For example if the name isBBC_Radio_4, the script will expect to find./BBC_Radio_4.mp3.
Interfacing the Pi with your radio
Invasive method
-
TURN OFF the radio and disconnect the power source.
-
Locate the point at which the tuner stage connects to the amplifier stage (in the schematic above, the branch connecting Pin 9 of the TDA1220B to C37) and de-solder the upstream end of the component (in our case the 3KΩ resistor just after pin 9 of TDA1220B).
-
Solder a 15cm long cables to the ground pin (black below) and another 15cm cable to either one of the Left or Right pins of your jack plug (yellow or red in image below). If you are unsatisfied with having only 1 channel, it is possible to hack together a small Stereo>Mono mixer like this one (link in french, great website).

-
Solder the cable connected to the ground pin (black above) to any ground point of your radio, e.g. a metallic part of the chassis or the ground end of C39. Solder the other cable to the connection you opened at step 1.
-
Connect the ground loop isolator to your male jack, and the male end of your isolator into the Pi’s audio output.
-
Turn on the radio carefully.
-
Now try to play any sound on your RPi. There are some MP3 files in the
firmwaredirectory of this project, or you can download a test file from the Internet (e.g.wget https://goo.gl/XJuOUW -O example.mp3 --no-check-certificate && mpg321 example.mp3).
Non-invasive method
If your radio has a DIN input connector like the R900, that’s great. You can read a bit more about the DIN connector, but basically it used to be extremely popular in audio applications, both as input and output connector.
The DIN connector’s typical shape can be seen in the green box on the schematic. You can either buy a DIN socket online and connect your Pi’s audio out to that, or you can solder your audio output cable directly to pins 1 and 4 of the DIN inlet, and the ground to pin 2. The former approach has the disadvantage that you’ll have a box containing the Pi hanging out of the radio, not the best effect, aesthetically.
Connecting the volume and tuning buttons
Now this is the hardest part.
Share